 Pre-sewn webbing slings come in a variety of sizes and colors to help you stay organized. The downside? They’re expensive. A cheaper option is to buy a spool or length of tubular webbing and tie your own using a water knot.
To get the right size every time I cut webbing lengths twice the length of the intended sling and add an additional 18 inches (46 cm) to accommodate for a water knot – this will leave you with approximately 4 inches of tail. Cut the webbing with a hot knife or other appropriate method to prevent fraying.
I like to create webbing slings of multiple lengths so I can quickly choose what’s best for any given situation. I find 2.5ft, 4ft, 7.5ft and 10ft webbing slings to cover most urban situations.

Use different colors of webbing or put colored tape on the tails to help you quickly distinguish between sizes.
Get into the habit of marking webbing slings clearly before placing them into general circulation. The tails are best for this since they’re easy to identify and not load bearing. Use a Sharpie to write the length and service date onto the tails for tracking. Check and ask about the history of any unmarked slings and inspect all slings before using.
Warning: Set the knot! Apply weight and secure all DIY webbing slings prior to use for life support (standing and bouncing on a freshly tied sling is a good way to do this). Short tails have the potential to slip under tension and a loose water knot is dangerously susceptible to snagging so be sure to keep water knots clear of any edges or snag points.

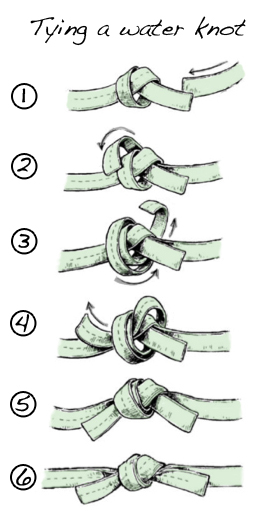 Great for making your own webbing slings or tying off wrapped webbing anchors.