So you’ve made a successful throw and are ready to get a rope up. This is a good time to pause and save yourself from unwanted surprises. Trace the path of the line and all surfaces that it’ll be contacting. Spot anything?
Rope and edge protection may not always be necessary but should always be considered. It can help protect trees from damage due to chafing and defend your line from hard angled beams common in industrial settings. Generally speaking – if you can’t inspect the load bearing surface your rope will be going over then best to use some protection. There can be imperfect or degraded edges on an otherwise smooth beam so don’t get sloppy – I came very close to learning this the hard way so trust me on this.
There are a few ways of fixing rope protection with a running line. The following, sometimes referred to as the “thread-and-haul” technique, is both simple and useful in a variety of applications.

Step 1: Start by fixing the throw line to the rope with a series of clove hitches or half hitches (if using a hose type rope protector thread the rope thru BEFORE tying on the throw line!). Make sure the rope is long enough to extend up and over the anchor and back to the ground. Slowly begin to raise the climb line – the rope should be stacked into a bag or flaked neatly on the ground to avoid tangles. Hint: Use a rope sleeve that opens and closes, rather then one that needs to be threaded, and you’ll avoid getting caught with your pants down.
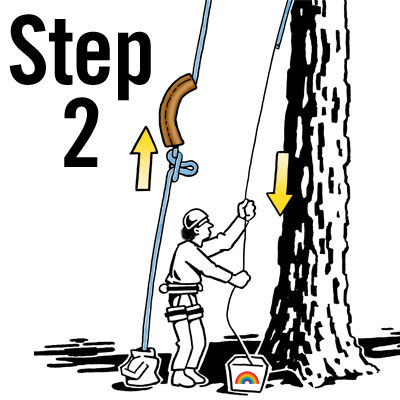
Step 2: Keep raising the climb line until the working end (the end attached to the throw line) extends over the anchor point you want to protect. Now tie a slip knot into the rope that’s being raised and place the rope protection above the slip knot (a velcro rope sleeve works well for this). The slip knot will prevent the rope protection from sliding down and guide it up to the anchor as you raise the climb line.
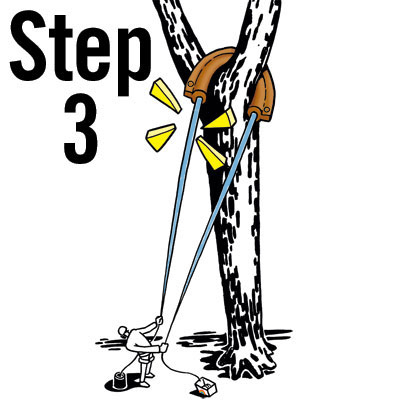
Step 3: Continue to raise the climb line. The rope protection will eventually reach the anchor. A quick flick of the wrist can help get it over rough or uneven surfaces. Once in position – with both rope ends on the ground – provide some tension and release the slip knot with a quick tug. You should now have the rope pro in place and two lines on the ground.
Getting this right and becoming efficient is a matter of practice. Not having enough line, getting tangled, tying the slip knot in the wrong direction, having the rope protection get caught up, and gauging distances can be tricky. Don’t sweat it – it happens to everyone. All it really takes is some time and a good laugh.
Still wondering how a line got up there in the first place? Find out how with some helpful info on throw line basics from Sherrill Tree.
