The Magnet Anchor

I’m an advocate of creative approaches to ropes and rigging — both in training and in the field. These are the spaces that turn gears and illuminate light bulbs. These are the spaces where we evolve as vertical practitioners.

This little experimagnetment all started with the simple pull of a magnet fixed to a refrigerator. The magnet popped off in my hand. “That must be around 5lbs of force,” I thought.  I just wrapped up a section on load sharing anchors while leading a climb training for Greenpeace USA in the Summer of 2014 and curiosity got the best of me.  Could I build an anchor out of these simple magnets?  How many would it take?  And so it began.

I weigh around 160lbs. Divide that by 5lbs (my estimate of how much force it took to pull the magnet off the fridge) and I was left with 32 — the minimum number of magnets needed to hold my weight.  This is assuming that my estimate was accurate, that I would be able to equalize all the magnets ‘perfectly’ and that additional forces don’t exist when getting onto or suspended from an anchor.  Knowing better I decided to double the amount but after searching the warehouse for every magnet available I was left with 51 magnets so 51 magnets it was.

My friend and fellow rope nerd, Van and I quickly got to work tying loops made from random bits of 2-4mm accessory cord to the plastic knobs on each magnet. These would become the individual anchor points for each of the 51 magnets.

magnetanchor-close

photo by Basil Tsimoyianis

We divided these into clusters that we painstakingly equalized into seven load sharing anchors.  These seven anchors were then brought together and equalized to create a single master point.

photo by Basil Tsimoyianis

photo by Basil Tsimoyianis

The end result was one master point made from eight equalized anchors whose loads were shared across 51 individual anchor points – in this case magnets.

photo by Basil Tsimoyianis

Untethered magnets will fall if they fail so if using this for training purposes don’t make the same mistakes pictured here – wear a helmet, have a separate belay line, and place a crash pad underneath you. Photo by Basil Tsimoyianis

The anchor was weight tested by people of varying sizes/weights and some even chose to bounce test it. Minimum breaking strength was never determined but I think it’s wise to call this one body weight only.

I’ll be the first to admit that this magnet anchor is not the most practical when it comes to field use but it’s an excellent training tool that highlights the concept of load sharing anchors and importance of equalization.

WARNING:  Magnets are not reliable anchors. Using a magnet or magnets as life support can and will likely kill you.  Untethered magnets will fall if they fail so if using this for training purposes don’t make the same mistakes pictured here – wear a helmet, have a separate belay line, and place a crash pad underneath you. Heck, grab yourself an umbrella while you’re at it.  Have fun but be careful.

Respect Wind

Long bottom lines on a banner, when used properly, make it possible to “fly” a banner like a kite and can reduce risks associated with high wind loads.

There are many things to consider when taking action in vertical environments but few can surprise you as much as wind.  This is particularly true when dealing with banners where high winds can be treacherous.

To put this in perspective, imagine deploying a 80 x 20 foot banner on a calm day.  You’re unexpectedly caught by 20 mph wind gusts that culminate to over 3,000 lbs of force on the banner — and you’re still attached to the bottom line.  You haven’t tied off the lower corner of the banner and are now flying a sketchy sail.  “It’s like riding a bull,” explains my good friend Cy Wagoner.

Wind forces can throw things around, tangle ropes, rip banners, push or pull people away from structures, jeopardize work/safety, and put a sudden end to a camp or occupation.  In either case, the result could be challenging (to say the least) or even catastrophic.

The following chart is one of many adaptations of the Beaufort Scale and is used to identify wind force on a scale of 0 to 12.  This along with wind velocity visual determination methods (see below) are practical tools for assessing wind speed in the field.

Beaufort Scale.cdr

source unknown

print material – source unknown

Wind Speed and Resultant Loads

When working with banners it’s good practice to consider potential wind loads that a banner may be subject to (the same holds true for any large object).  The following table has been adapted from the Scaffold Training Institute manual and offers some conservative numbers for approximating potential wind loads (basic math skills required).  It does not account for direction, angle, material types, and other variables so consult a structural engineer or physicist if a high degree of accuracy is desired.  Better yet, speak to those with first hand experience.

Wind-Force-Table.xlsx

Remember, respect the wind and account for it in your planning — this should include risk mitigation and a wind response plan in case of unsuspected gusts.  Plan accordingly and consult those with experience.

DIY Lanyards

Lanyards, sometimes referred to as cows tails or lobster claws, come in many forms.  Common uses include connecting to an anchor, assisting in vertical or horizontal progression, and/or holding position where needed.  You can buy adjustable and non-adjustable lanyards or make them yourself.  Those from manufacturers will often have sewn termination points instead of knots and adjustable versions will usually consist of mechanical rope grabs or buckles — they also cost considerably more than DIY options.
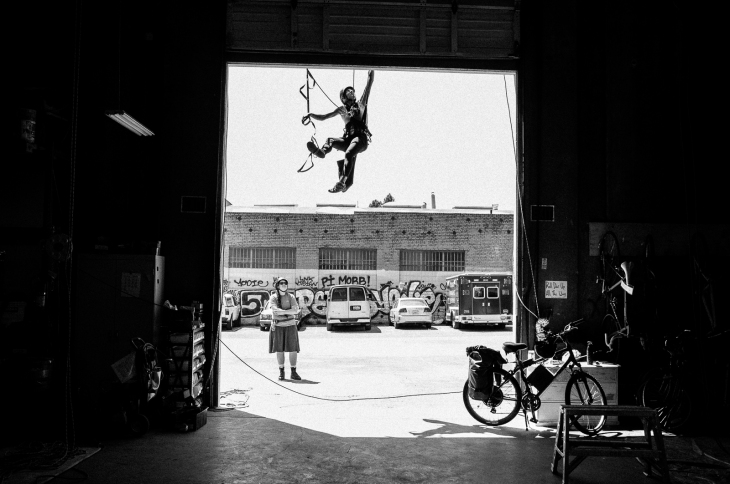
A climber uses lanyards as a means for progression while aid climbing during a training.

A climber uses three DIY lanyards while aid climbing.

PERKS TO THE DIY LANYARD

  • Materials are easy to acquire
  • Knots are much better at absorbing shock then sewn termination points and will reduce the impact on your body in a fall
  • Prusiks are lighter, cheaper, and easier to acquire than mechanical rope grabs
  • Customization!  Length, color, rope diameter, composition, etc.
  • Low budget
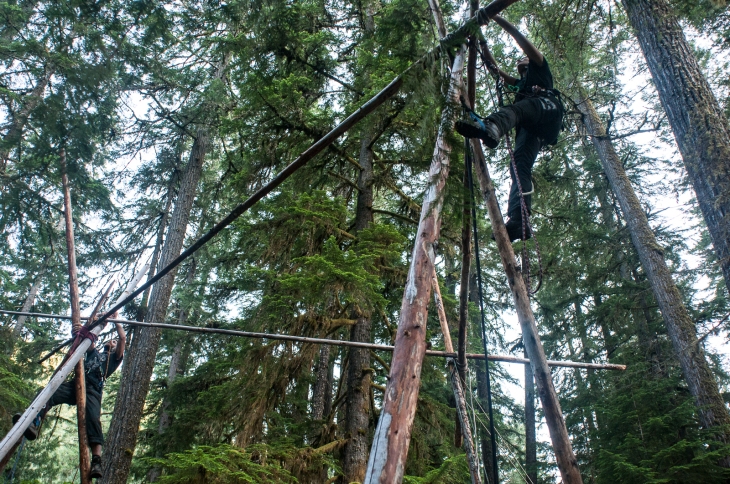
Climbers use DIY lanyards to hold themselves in position while rigging a tri-bi-mono-pod during an Earth First! Climbers Guild camp in Oregon.

Climbers use DIY lanyards for work positioning while rigging a tri-bi-mono-pod during an Earth First! Climbers Guild camp in Oregon.

THINGS TO CONSIDER WHEN MAKING A DIY LANYARD

Know your equipment.  Use equipment rated for climbing.  Don’t use rope or gear that you would not otherwise climb on.  Retired gear should not be made into a lanyard!  Know the history and condition of the equipment you’re using — if you have doubts then best not use it.  It’s good practice to label, track, and retire lanyards accordingly.

Dynamic or Static?  It depends.  Dynamic lanyards have the benefit of absorbing impact forces resulting from a fall.  Use them to connect to static systems, move across multiple points, or to protect against a fall.  Static lanyards (made from webbing or static rope) lack the elastic properties found in dynamic lines and do a better job at reducing unwanted movement or bounce.  Use them when you plan to work or move directly on loaded lanyards.  Examples of this would be progressing up a tree, sitting back on your lanyard for positioning, or restraining yourself from an edge.

icon_1636A fall on any static system can result in serious injury or death.  Use proper technique when climbing with static lanyards to avoid shock loading your system.  Use a shock absorber or prusik hitch as a link to your static lanyard to reduce the impact on your body in case of a fall.

How about the diameter?  10.5mm and 11mm diameter lines are the go to if you expect your lanyards to take a beating.  Wrapping your lanyard around trees or beams and/or running it over edges will reduce the life span and integrity of your lanyard.  Thicker lines are a good choice for training programs or extended actions where prolonged wear and tear is likely.  That said, 9.4mm to 10mm lanyards are lighter, less bulky, and easier to work with.  They’re plenty strong but are best reserved for experienced climbers and their condition should be carefully monitored.
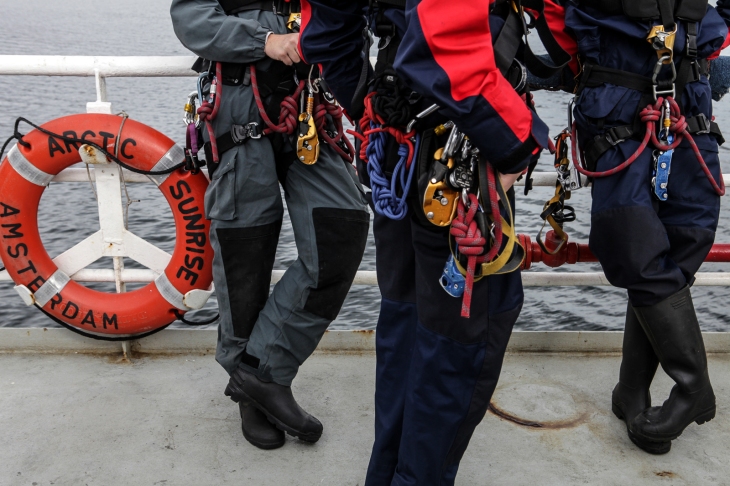
Climbers with Greenpeace on the Arctic Sunrise in the Barents Sea. Photo: Igor Podgorny, July 2012

Climbers with Greenpeace on the Arctic Sunrise in the Barents Sea. Photo: Igor Podgorny, July 2012

Know your knots.  The figure eight follow thru, eight on a bite, and barrel knot/scaffold knot, are the three most useful knots for tying your own lanyards.  The figure eight follow thru is the knot of choice for tying a lanyard directly to the master point of your harness (the overhand follow thru is a low profile alternative but is much more difficult to untie once firmly loaded).  The figure eight on a bite is great for when you’re able to clip in directly or want carabiners to rotate freely.  The barrel knot is best in situations where you want to use minimal rope or capture a carabiner in a specific orientation — this helps restrict movement and prevent cross loading.

icon_6770Keep your knots low profile!  The gain (eye of your knot) should be kept short to prevent snagging and conserve rope length.  The tail of your knot should be about a palms width and no longer (it’ll just get in the way).  I often tape my tails so they don’t flap around once I have everything adjusted.
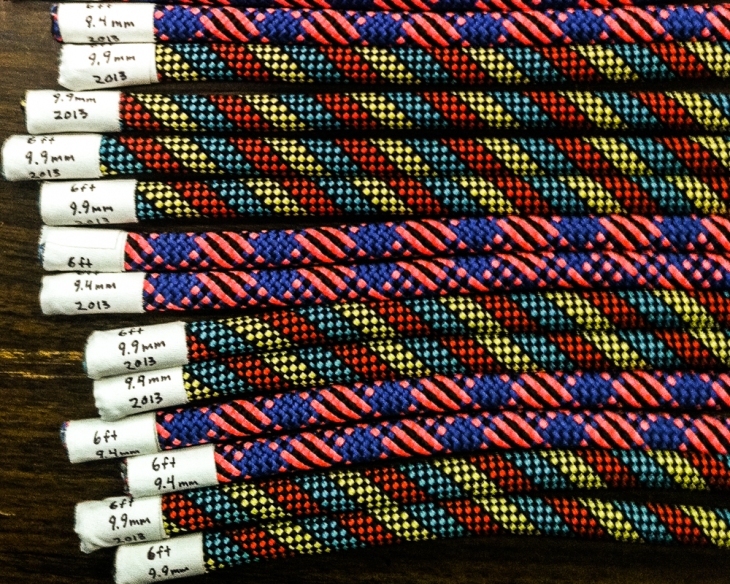
Lanyard lengths cut from dynamic climb line and labeled accordingly with length, diameter, and date of service.

Lanyard lengths cut from dynamic climb line and labeled accordingly with length, diameter, and date of manufacture.

Length.  This is highly dependent on your intended purpose.  Short lanyards are common practice in rope access or rock climbing where you’re often connecting lanyards to devices or anchor points within reach.  Longer lanyards are necessary for climbing trees that require you to wrap large diameter trunks or extend to limbs beyond your reach.  Regardless of what you choose it’s often useful to have at least one lanyard that’s an arms reach — this includes the knots and carabiners.  A 6 to 7 foot (~2m) length of rope is a good place to start.  If you want to tie two lanyards consider doing it with a longer single length of rope — about 12 to 14 feet (3.5-4.5m) or more depending on your needs.  This alternative will leave you with a third point of attachment between the two lanyards (see below).

icon_1635Lanyards extending beyond your reach require specific techniques and should be used with caution.  They are best restricted for use as a flip line, restraint line, or progression in trees.
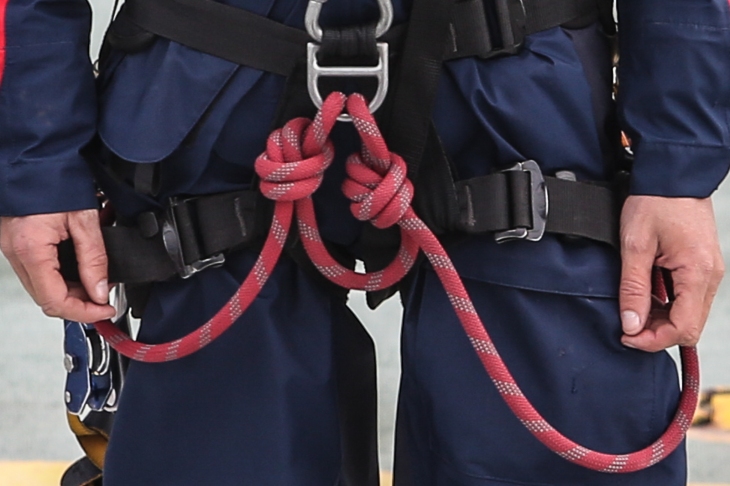
Two lanyards tied from one 12ft length of dynamic line. The point isolated between the lanyards creates a loop that serves as another point of connection.

Two lanyards tied from one 12ft length of dynamic line. The bridge (bight of rope isolated between the lanyards) serves as another point of connection.

Adjustable lanyards.  There are multiple ways to do this but the simplest and most recognized method uses a prusik loop (6mm works well with lanyard diameters of 9 to 11mm).  Start with a short prusik loop and tie a prusik hitch around your lanyard.  Clip the prusik back to the master point on your harness (you can avoid using a carabiner by retying the prusik loop directly to your harness as seen in the image below).  You can also fasten a quick link/screw link beneath the prusik hitch on your lanyard and back to your harness as pictured — this will tend the prusik and allow you to shorten the lanyard with one hand (this technique was shared to me by a friend who had climbed with Robin Wood, a German environmental organization).

icon_6770Adding a prusik as a point of connection to your lanyard can help reduce impact forces resulting from a fall.   A prusik will slip slightly before locking up if subject to high loads or forces.  This absorbs energy and will reduce stress on your overall system and body.
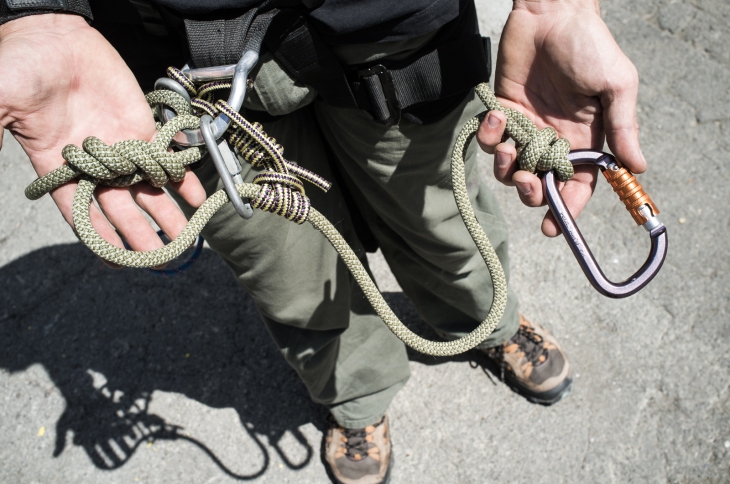
Adjustable lanyard. Notice the four components: barrel knot restricts carabiner movement, prusik for adjustment, screw link tends prusik, eight follow-thru tied directly to central point on harness.

Adjustable lanyard — notice the four components: barrel knot restricts carabiner movement, prusik captures preferred lanyard length, screw link tends prusik for one handed adjustment, eight follow-thru tied directly to central point on harness.
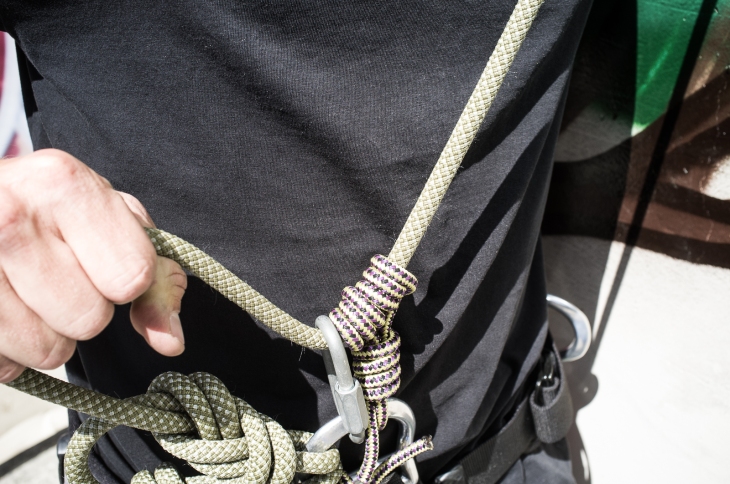
The addition of a quick link allows for one handed operation when using prusiks.

The addition of a quick link allows for one handed operation when using a prusik to create an adjustable lanyard.

WHATEVER YOU USE JUST DON’T FORGET — A GOOD LANYARD WILL:

  • Be made of climb rated materials in good condition
  • Be connected to a load bearing point on your harness intended for the job
  • Hold you where you want to be
  • Catch a fall while minimizing impact
  • Be simple and easy to use
It’s important to note that there are many options and nuances for lanyards not covered here.  If you’re unsure of something ASK!
 Dynamic rope (sold by the foot!) — Visit our store for current pricing

Input or tips?  Please share. 

Rules and Rote – Mold, cigarettes, and dropped gear

contributed by Dan Rudie

Perspective first, answer second —

“Will mold and mildew affect the strength of my rope?”

Greenpeace activists hang a large warning box on the outside of the coal-fired power plant of electricity supplier E.ON at the Maasvlakte in June of 2006. Photo: Philip Reynaers.

Greenpeace activists hang a large warning box on the outside of an E.ON coal-fired power plant at the Maasvlakte. Photo: Philip Reynaers – June 2006.

Like most climbing questions, there is no single definitive answer. It depends. Most climbing things we have learned and probably pass on others are “rules and rote”. Since climbing can be dangerous, we learn rules that we guard as absolutes. For example, “Never smoke cigarettes around your gear” and then you find that occupational folks do it all the time with no discernible problem. Or never use bleach on rope period, then find out that fire rescue teams have protocols for decontaminating ropes with bodily fluids using chlorine bleach solutions.

Here’s a story to highlight my point.

I remember long ago being taught that if I dropped a carabiner from six feet on to concrete it could cause fractures that could cause it to fail under load. Is that true? Are carabineers really that fragile? Well the answer is no, not anymore, but they once were. When the first aluminum carabiners were made for the military the gates were made of cast aluminum. They were subject to fractures and cracking where the pin connects the gate to the main body. The military didn’t use them for lead climbing and tended not to put them in shock loading situations. These wonderful light weight carabiners quickly made their way into the climbing community and eventually so did gate failures which were much more severe from a leader fall shock load. These little lightweight gems were handled like eggs and strict rules were formed. Many people still adhere to these rules today not knowing why the rule was formed or if it still applies. Guess what? It doesn’t. Carabiners haven’t used cast aluminum for almost four decades (read about the history of carabiners).  Tests have been done where modern forged aluminum carabiners have been hurled down 40 feet onto solid rock and they break tested 100%. Many modern carabiners could actually be made stronger by smashing them with a hammer as the metal could be further cold forged. Not that you should try this but it adds some color to the picture. If you don’t know the basis of a climbing rule stick to that rule, it could save your life after all.

“If you don’t know the basis of a climbing rule stick to that rule, it could save your life after all.”

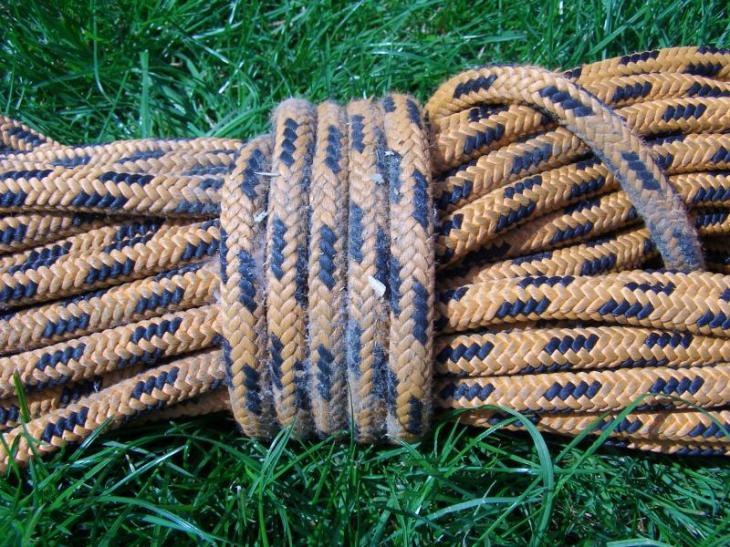
mold rope

“SO WHAT ABOUT MOLD AND MILDEW?”

Mold and mildew will not have any appreciable strength reduction for the fibers used in modern life safety ropes (nylon, Kevlar, spectra, Dyneema, etc). Long ago climbers used manila, hemp, sisal and various other natural fibers and mold could destroy these types of rope in very short order. In those days if you stored a rope wet, you might just as well stored it in the trash can. Synthetic fibers have entirely replaced natural fibers in the climbing world. Since almost all life safety ropes that stretch are made of nylon, let’s focus on that. Mold and mildew cannot “feed” on nylon. The bacteria will not eat or dissolve the nylon fibers. If you have nylon fabrics that are in fact covered in either mold or mildew, the mold or mildew is growing on something else in or on the rope (sweat, urine, sugar, etc). If, for example, you had a rope that became wet and developed mold and you took that rope and thoroughly dried it, the moldy dry rope would be far stronger than an identical new wet rope. Nylon can lose about 20% of its strength when soaking wet. Most climbers wouldn’t worry about using a wet rope if they got caught out in the rain (or for that matter the knot that can reduce 20 – 40 %). Now, if you had a rope that was covered in mold or mildew, strength is not an issue, but friction might be. Rappelling or friction hitches on a mildew clad rope might require additional measures to add friction. Naturally one would clean and dry the rope before using it, so this not likely to be an issue. But worth knowing if you are faced with that situation.

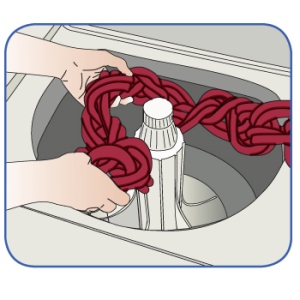
rope-washing

wash your climbing rope – mcnett.com

In my experience what most climbers think is mold and mildew is actually staining. Nylon fibers will absorb water (which is why wet ropes are weaker) in this process ropes that have become wet (either soaked or from humidity) will absorb a lot of staining materials as well. Even nylon ropes that have never been wet or humid will absorb very small particles of “gunk” and cause the rope to discolor (white ropes do not stay white for long). No amount of cleaning will remove these absorbed stains. Just imagine all the aluminum powder, chalk, dirt, sweat, etc, that covers any average rope. Get the rope wet and all that dark gunk will soak into the fibers. Not to worry as they are just colored particles and too small to cause any damage (grains of course sand are a different story). Coil a rope with your bare hands after a day of climbing and you will see on your hands how dirty ropes are. If you actually are dealing with mold, mildew or other bacteria, when dried you will see spores and powder growing larger than the rope fibers. You would be able to scrape some off and see the pores becoming airborne. If you are dealing with mold and mildew, you will just need to wash the gear and dry it properly. It will still be covered in stains when you’re done, but this will have no effect on the strength. As always, properly storing gear to keep it dry is wise well practiced rule. However a rope stored for a year in distilled water, that is then properly dried is still as good as one stored dry. But a nylon rope soaked for a year in chlorinated tap water is not (though still useable). Test have been done where a new rope was soaked in gasoline for six months and dried and tested. The rope showed some degradation, I think it was 5% – 10% but was still usable, a bit smelly though. Nylon is made from petro-chemicals after all. Proper gear storage is important and it is a reflection of how one treats and maintains their gear. If someone said “let’s go climbing I have all the gear right here.” and then pulled out a moist moldy rope, I would be a bit suspect about how well the rest of their gear is taken care of.

So, the answer is “it depends”. What’s the rope made of? What’s on the rope? How was the rope stored when it got wet? Where was it stored?

However, to the question “will mold or mildew appreciable affect the strength of nylon rope?”, the answer is no.

Stopper Knots

A stopper knot is any knot tied at the end of a rappel rope that prevents a climber from rappelling off the end of the rope.  Many accidents and fatalities are a result of insufficient stopper knots or none at all.

RULES OF THE STOPPER KNOT:

  • A stopper knot must be larger than the passage/clearance of the rappel device being used

  • A stopper knot is dependent on the diameter of line being used (thinner diameter lines require larger stopper knots)

  • Stopper knots must be placed on BOTH lines if rappelling off running lines

  • Always check the ends of your rope(s) for adequate stopper knots

In July of 2009 I had a stopper knot slip thru my hand while wrestling with a banner on Mount Rushmore near Keystone, South Dakota.  Things were hectic and I was exhausted and dehydrated.  It happened fast and before I knew it I was 300ft in the air and hanging out between good ol’ Teddy and Abe with a double overhand stopper knot jammed into my rappel device (I was using the Petzl STOP).

Moral of the story?  Tie a knot at the end of your rope!  But remember – NOT ALL STOPPER KNOTS ARE CREATED EQUAL!

NEVER use a single overhand knot as a stopper knot! They can slip thru rappel devices.

NEVER use a single overhand knot as a stopper knot! They can slip thru rappel devices.


Stopper knots come in all shapes and sizes.  Choosing which is best can prevent a lot of hassle and even save your life.  Use this list of six with the rules above to help you choose the best stopper knot for any given situation.


DOUBLE OVERHAND

double_overhand

Pros

  • Simple
  • Fast
  • Uses minimal rope

Cons

  • Slim profile (rope diameter and rappel device must be carefully considered!)

TRIPLE OVERHAND

triple_overhand

Pros

  • Simple variation to double overhand
  • Larger profile than double overhand

Cons

  • More likely to get jammed or stuck on edges or in cracks/crevices

QUADRUPLE OVERHAND

quadrupal_overhand

Pros

  • Variation to triple overhand
  • Larger profile than triple overhand

Cons

  • Requires more rope than the other overhand variations
  • More likely to get jammed or stuck on edges or in cracks/crevices
  • More cumbersome to tie than the other overhand variations

CAPUCHIN (double overhand on a bight)

capuchin

Pros

  • Simple
  • Wide profile (ball shape)
  • Good choice for thinner diameter ropes or rappel devices with greater clearance
  • Knot of choice for figure 8 descender or when descending with a mule hitch (carabiner dependent!)

Cons

  • Requires a fair amount of rope
  • More likely to get jammed or stuck on edges or in cracks/crevices
  • Open loop is a point for snagging

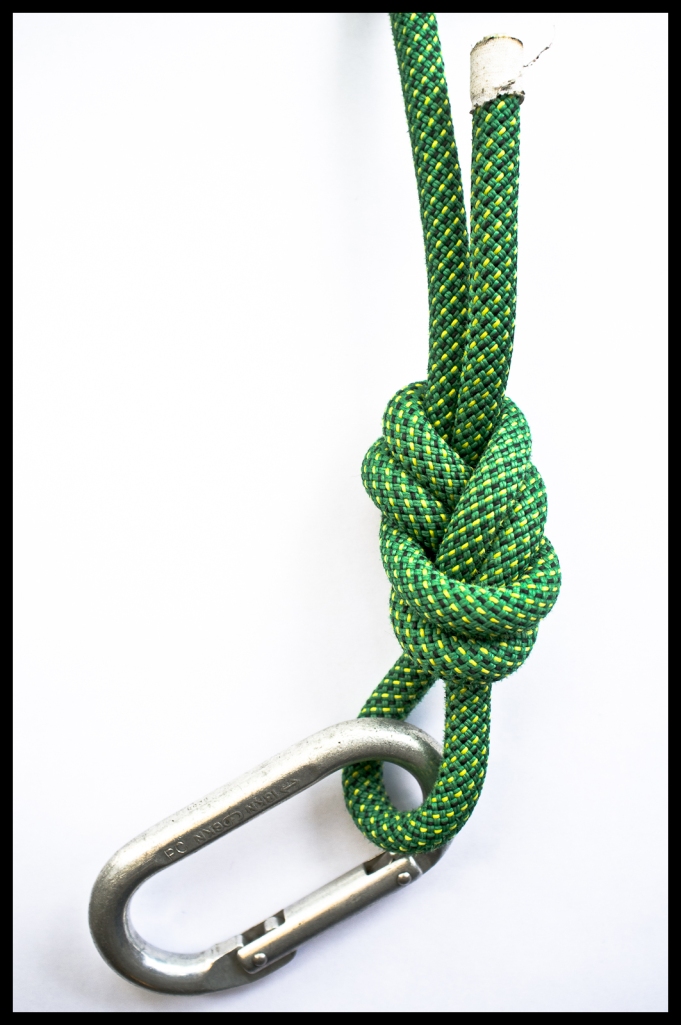
FIGURE EIGHT ON A BIGHT

figure-eight_onbight

Pros

  • Simple
  • Fast
  • Large profile
  • Good choice for thinner diameter ropes or rappel devices with greater clearance

Cons

  • Requires a fair amount of rope
  • More likely to get jammed or stuck on edges or in cracks/crevices
  • Open loop is a point for snagging

FIGURE EIGHT ON A BIGHT WITH ADDED CONNECTOR

figure-eight_onbite_connector

Pros

  • Fast and easy variation to the figure eight on a bight
  • Large profile

Cons

  • More likely to get jammed or stuck on edges or in cracks/crevices
  • Open loop and connector is a point for snagging
  • Requires more gear
  • Hard gear has the potential to damage surroundings or injure bystanders