Lanyards, sometimes referred to as cows tails or lobster claws, come in many forms. Common uses include connecting to an anchor, assisting in vertical or horizontal progression, and/or holding position where needed. You can buy adjustable and non-adjustable lanyards or make them yourself. Those from manufacturers will often have sewn termination points instead of knots and adjustable versions will usually consist of mechanical rope grabs or buckles — they also cost considerably more than DIY options.
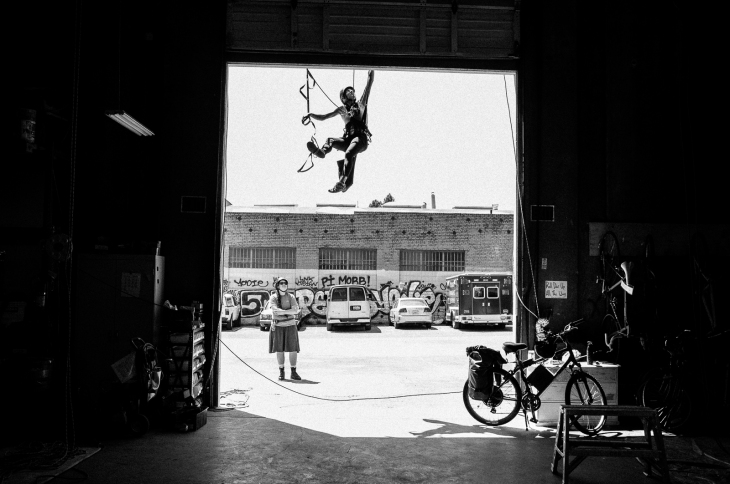
A climber uses three DIY lanyards while aid climbing.
PERKS TO THE DIY LANYARD
- Materials are easy to acquire
- Knots are much better at absorbing shock then sewn termination points and will reduce the impact on your body in a fall
- Prusiks are lighter, cheaper, and easier to acquire than mechanical rope grabs
- Customization! Length, color, rope diameter, composition, etc.
- Low budget
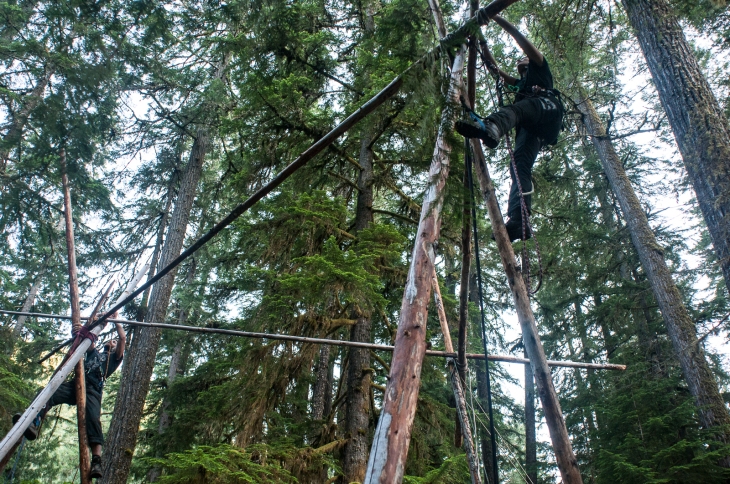
Climbers use DIY lanyards for work positioning while rigging a tri-bi-mono-pod during an Earth First! Climbers Guild camp in Oregon.
THINGS TO CONSIDER WHEN MAKING A DIY LANYARD
Know your equipment. Use equipment rated for climbing. Don’t use rope or gear that you would not otherwise climb on. Retired gear should not be made into a lanyard! Know the history and condition of the equipment you’re using — if you have doubts then best not use it. It’s good practice to label, track, and retire lanyards accordingly.
Dynamic or Static? It depends. Dynamic lanyards have the benefit of absorbing impact forces resulting from a fall. Use them to connect to static systems, move across multiple points, or to protect against a fall. Static lanyards (made from webbing or static rope) lack the elastic properties found in dynamic lines and do a better job at reducing unwanted movement or bounce. Use them when you plan to work or move directly on loaded lanyards. Examples of this would be progressing up a tree, sitting back on your lanyard for positioning, or restraining yourself from an edge.
![]() A fall on any static system can result in serious injury or death. Use proper technique when climbing with static lanyards to avoid shock loading your system. Use a shock absorber or prusik hitch as a link to your static lanyard to reduce the impact on your body in case of a fall.
A fall on any static system can result in serious injury or death. Use proper technique when climbing with static lanyards to avoid shock loading your system. Use a shock absorber or prusik hitch as a link to your static lanyard to reduce the impact on your body in case of a fall.
How about the diameter? 10.5mm and 11mm diameter lines are the go to if you expect your lanyards to take a beating. Wrapping your lanyard around trees or beams and/or running it over edges will reduce the life span and integrity of your lanyard. Thicker lines are a good choice for training programs or extended actions where prolonged wear and tear is likely. That said, 9.4mm to 10mm lanyards are lighter, less bulky, and easier to work with. They’re plenty strong but are best reserved for experienced climbers and their condition should be carefully monitored.
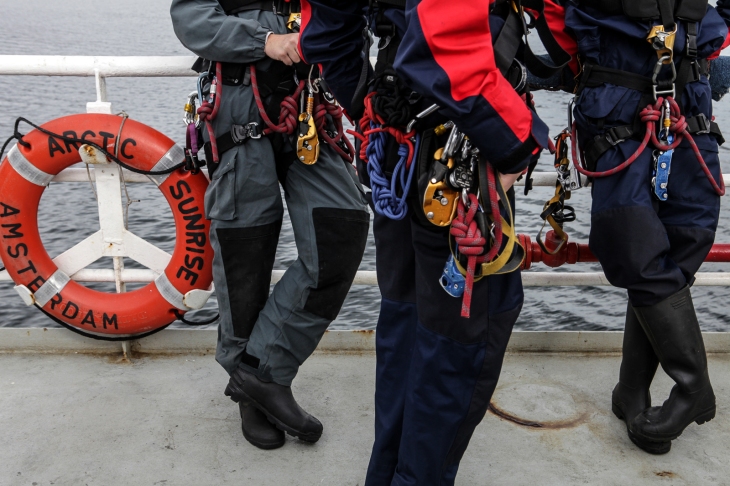
Climbers with Greenpeace on the Arctic Sunrise in the Barents Sea. Photo: Igor Podgorny, July 2012
Know your knots. The figure eight follow thru, eight on a bite, and barrel knot/scaffold knot, are the three most useful knots for tying your own lanyards. The figure eight follow thru is the knot of choice for tying a lanyard directly to the master point of your harness (the overhand follow thru is a low profile alternative but is much more difficult to untie once firmly loaded). The figure eight on a bite is great for when you’re able to clip in directly or want carabiners to rotate freely. The barrel knot is best in situations where you want to use minimal rope or capture a carabiner in a specific orientation — this helps restrict movement and prevent cross loading.
![]() Keep your knots low profile! The gain (eye of your knot) should be kept short to prevent snagging and conserve rope length. The tail of your knot should be about a palms width and no longer (it’ll just get in the way). I often tape my tails so they don’t flap around once I have everything adjusted.
Keep your knots low profile! The gain (eye of your knot) should be kept short to prevent snagging and conserve rope length. The tail of your knot should be about a palms width and no longer (it’ll just get in the way). I often tape my tails so they don’t flap around once I have everything adjusted.
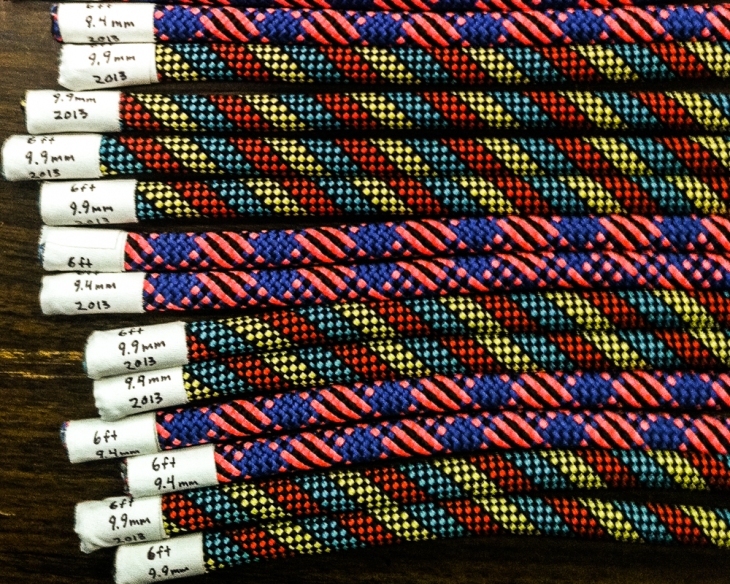
Lanyard lengths cut from dynamic climb line and labeled accordingly with length, diameter, and date of manufacture.
Length. This is highly dependent on your intended purpose. Short lanyards are common practice in rope access or rock climbing where you’re often connecting lanyards to devices or anchor points within reach. Longer lanyards are necessary for climbing trees that require you to wrap large diameter trunks or extend to limbs beyond your reach. Regardless of what you choose it’s often useful to have at least one lanyard that’s an arms reach — this includes the knots and carabiners. A 6 to 7 foot (~2m) length of rope is a good place to start. If you want to tie two lanyards consider doing it with a longer single length of rope — about 12 to 14 feet (3.5-4.5m) or more depending on your needs. This alternative will leave you with a third point of attachment between the two lanyards (see below).
![]() Lanyards extending beyond your reach require specific techniques and should be used with caution. They are best restricted for use as a flip line, restraint line, or progression in trees.
Lanyards extending beyond your reach require specific techniques and should be used with caution. They are best restricted for use as a flip line, restraint line, or progression in trees.

Two lanyards tied from one 12ft length of dynamic line. The bridge (bight of rope isolated between the lanyards) serves as another point of connection.
Adjustable lanyards. There are multiple ways to do this but the simplest and most recognized method uses a prusik loop (6mm works well with lanyard diameters of 9 to 11mm). Start with a short prusik loop and tie a prusik hitch around your lanyard. Clip the prusik back to the master point on your harness (you can avoid using a carabiner by retying the prusik loop directly to your harness as seen in the image below). You can also fasten a quick link/screw link beneath the prusik hitch on your lanyard and back to your harness as pictured — this will tend the prusik and allow you to shorten the lanyard with one hand (this technique was shared to me by a friend who had climbed with Robin Wood, a German environmental organization).
![]() Adding a prusik as a point of connection to your lanyard can help reduce impact forces resulting from a fall. A prusik will slip slightly before locking up if subject to high loads or forces. This absorbs energy and will reduce stress on your overall system and body.
Adding a prusik as a point of connection to your lanyard can help reduce impact forces resulting from a fall. A prusik will slip slightly before locking up if subject to high loads or forces. This absorbs energy and will reduce stress on your overall system and body.

Adjustable lanyard — notice the four components: barrel knot restricts carabiner movement, prusik captures preferred lanyard length, screw link tends prusik for one handed adjustment, eight follow-thru tied directly to central point on harness.
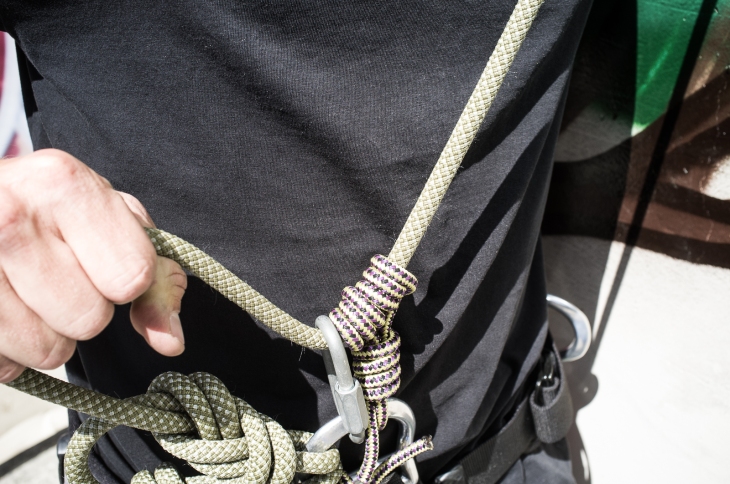
The addition of a quick link allows for one handed operation when using a prusik to create an adjustable lanyard.
WHATEVER YOU USE JUST DON’T FORGET — A GOOD LANYARD WILL:
- Be made of climb rated materials in good condition
- Be connected to a load bearing point on your harness intended for the job
- Hold you where you want to be
- Catch a fall while minimizing impact
- Be simple and easy to use
Input or tips? Please share.

Experienced arborists tend to make their own lanyards with a small pulley underneath the prussik. It’s the same principle you use with your quick link, but it’s much smoother for one hand operation. Thanks for the article, I’m going to use your method to save money at the moment, and when I can afford it I’ll go to the pulley.
Great post. I was checking continuously this blog and I’m impressed!
Extremely useful information specially the last part :
) I care for such info much. I was looking for this particular
information for a long time. Thank you and best of
luck.
Hi there, fantastic article. Im brand new out the wrapper to this and this article was exactl what i was looking for ! Thank you. One small question i have is how is that prusik barrel knotted t the clip?? looked at the pics a hundred times and cant for some reason replicate it lol. I guess to add a pulley instead of the crab you wouldnt have to change anything right? great work though thank you.
Hi Kris. Thanks for the kind words. The prussic in the method pictured is not attached with a barrel knot — it’s simply threaded thru the main connection point and tied off using the fishermen. I simply use a ~2ft length of 5mm or 6mm cord (not a loop) and use a bite to tie a prussic hitch onto the lanyard directly. I then thread the open ends coming off the hitch thru my main connection point and tie them off with a fishermen to close the prussic loop directly. There are many ways to do this but the simplicity of this is hard to beat.